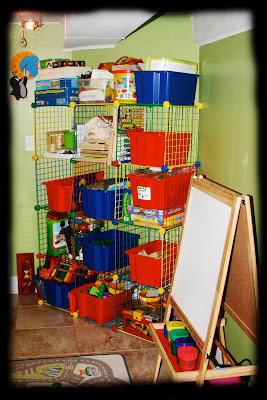
I don't know about you but I always like to see how other families organize their homeschool rooms! When we started, our room didn't look anything like this. It had some shelves to help me organize our school supplies but it wasn't until this year when I had better idea about what I need to stay on task and make life smoother not only for me but also for the kids.
Colorful is always more fun for the kids. I purchased most of my things in IKEA - the red and blue bins store art supplies (they cost under a dollar each) and the shelving unit they are in is actually IKEA bathroom shelving unit (I had this one for years and it happened to fit into this spot perfectly). On top of the shelving unit are our egg carton games.
I will continue along this wall where we have our main desk area. Again, inexpensive IKEA table top (red color is a big hit with our kids but they also have other colors) and four legs you buy separately. Above the desk I placed alphabet cards I once bought on sale in Borders book store.
Let's take a closer look at my cute containers! This station is my favorite part of the room. I purchased the small buckets in the Target dollar section (downside to this is that Target hardly ever brings items in the dollar section back in the same colors so you should make sure you get more than enough for yourself right away). I store various items in these buckets - whatever I need while I teach (erasers, counting beads, but also stapler, hole puncher and my scissors.)
The lower buckets hanging on the rail are from IKEA - again for such a small price I organized art supplies we use the most - crayons, color pencils, glue, scissors, and markers.
Closer look at the IKEA buckets.
Here is a shot of our bulletin board. When I took this picture it was beginning of the year so nothing was on it just yet. Since that time, I change the curtains to orange (our old living room curtains). You can see those on the picture underneath this one.
And our new workboxes!!! I am very excited about them! They help us stay on task and the kids love the mysterious drawers full of fun activities. I will share my workbox experience with you in a different post.
And our new workboxes!!! I am very excited about them! They help us stay on task and the kids love the mysterious drawers full of fun activities. I will share my workbox experience with you in a different post. Next to the workboxes is our "Free activity bin" with fun things the kids get to do if one is finished with his/her workbox faster than the other. After the other one finishes, they can continue working together on the free activity and then move on to the next drawer at the same time.
The door calendar comes next. I like the fact that it is on the door because when I open it, the kids can also see it in our other school room (the reading and play room), where we actually talk about the calendar and the weather. We got this one on Amazon.
This year, I painted blackboard on our big unused wall. So far it has worked great but I think I might like big eraser board better. This is a nice experience for the kids - using the chalk on a big blackboard is just about the only thing I remember from my elementary school years. And they have had a ball with it. However I can never get it quite cleaned the right way and so it is sometime difficult to see what I write. And then it looks messy. I think I might upgrade this one once I find a good deal on the large eraser board.
And last but not least my storage unit for some of the school games, puzzles, and other fun supplies. Again, is this ideal? Not really - it is too open and not everything fits in the slots. But I got this for free so I want to make it work for now. The IKEA bins helped a lot to organize the small things. The bigger supplies are just organized to make enough sense to me. (This picture was taken before I painted the blackboard on the wall)
Please, leave a comment and most of all - attach a link with your homeschool room pictures so we can take a peak on your learning space! Thanks for stopping by!


